Wednesday

progress is good: part 2


It's amazing the difference a couple weeks can make. I was so surprised when I went to my clients house last Friday to see how much progress has been made, they are doing such a great job and they move fast. Check out the first post on the house here, you will see the big changes that have been made from that first post to the pictures below. Amazing what dry wall can do!

kitchen

dining room

living room looking into the sun room

living room looking into kitchen

master bedroom looking into sitting room
Stayed tuned for more pictures. I was there just yesterday and can't wait to share how different everything looks. They got all the trim done, most of the kitchen put together and the paint on the walls, tile up in the bathrooms, so it definitely moving along. The lights are going to start getting hung and the granite installed by the end of the week. My client has been away so can't wait to see what she thinks when she gets back. Check back for the progress.

Thursday

Ryan's room

Over the last couple days I have been busy at one of my clients painting a mural. It was for their son Ryan. Of course being a boy, he loves anything that moves so I thought how fun to paint a big car on the wall behind his bed. I tried to keep the room a little more grown up so he won't grow out of it in a year. 
The room has has a lot of primary colors, with his plaid quilt and window treatments so the colors in the signs and car were a great match. I painted a street sign named, "Ryan ST",  a stop sign and traffic light.  Below is the car painted behind his bed. To personalize it I painted a license plate with his initials on it.


Here you can see the part of the two walls, the car and then the street sign.


The canvas next to the sign is so cute, it's from Pottery Barn. It looks great with the new sign. 


A close up of the traffic light    


The stop sign is at the foot of his bed on the opposite wall


It was a fun job and glad that I could be a part of making his room complete.

Wednesday

Design challenge room reveal!

I'm so excited to be posting the design challenge room before and after pictures. Remember this from back in the fall? I went to the house yesterday. I hadn't been back since we had gone over the ideas and options for the room and was so thrilled with the results. During the process we went over all the ideas and I gave them my suggestions with the paint, layout and other ideas to bring the room together. The rug, for example, was a big design element that really inspired the colors in the room. But what was so great is they took all of that and went a step beyond to really add their own touches. They did an amazing job! (you can check here for the original post on the room and see the progress post here).


before

after

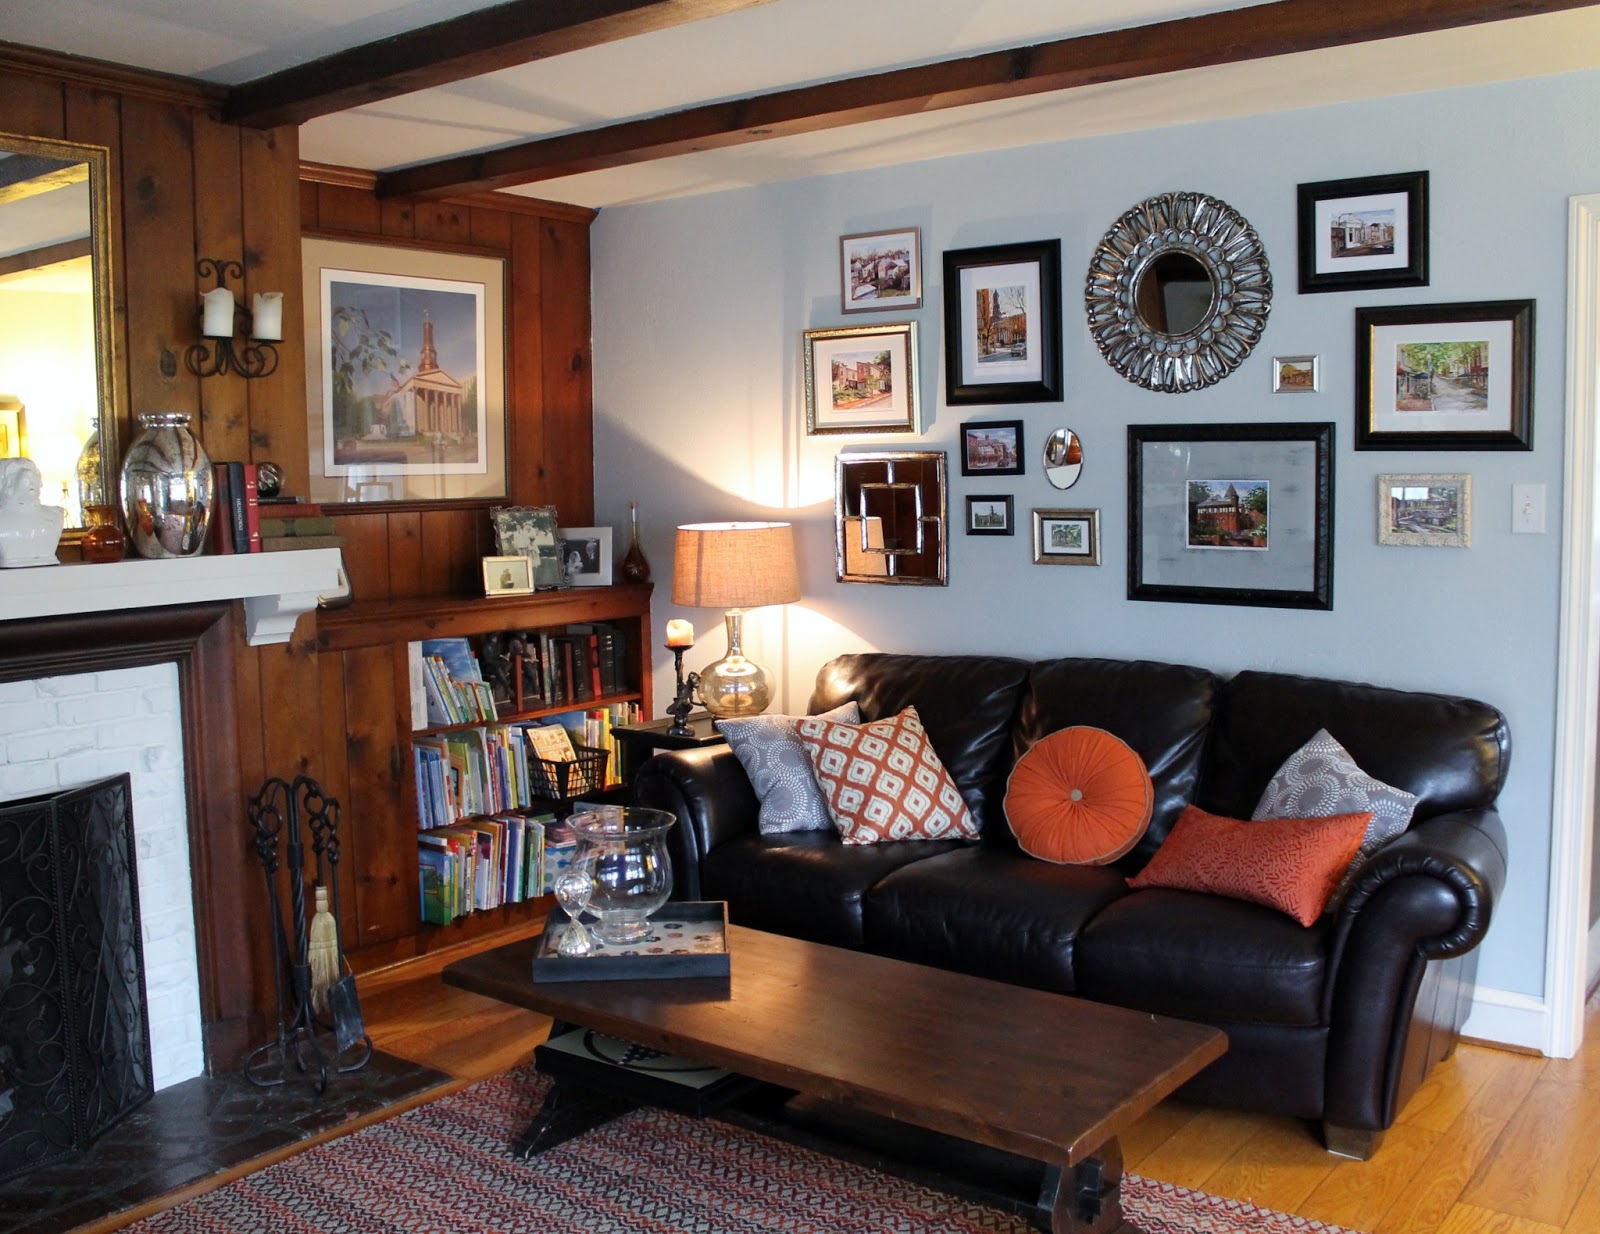
The room felt a little small and crowded. By moving things around a bit it really opened things up, as you see in the before pictures. and I love what she did with the wall above the sofa. Liz has a great collection of local artwork of scenes from the town she lives in and grouped them together with some different sized mirrors. It now looks so inviting and cozy.
                               
before

after
By flipping the chair with the sofa and armoire, it really balanced out the room and feels so much bigger. The only thing taken out of the room was a smaller chair you see in the first picture above and the small bookshelf that was hidden behind the door. Also as you see Liz painted the armoire. She used Annie Sloan Chalk paint - I think I may have gotten her addicted to it! But it looks great and helped out by lightening up the piece and eliminating another wood colored piece in the room. 

As you may remember one of the decisions that she was struggling with was whether to paint all of the wood on the fireplace wall. After talking through things we both decided it would be best to take baby steps. The wood is so beautiful, so as a compromise, they painted the mantle and the brick surround which really makes it pop out now. We talked yesterday and said that a next step could be, if she still feels like it's needed, to paint the bookshelves below. But again it may not be needed with all the changes that were made. 

We had discussed ways to bring more light into the room and Liz found this great mirror that looks beautiful and reflects so much light into the room. It made a huge difference. Also notice the panels by the windows that really soften up the room and make it seem so cozy. We talked about the lamp by the window which still needs to be replaced.


before

after

You can really see from these two pictures above how cramped it was in the room before. It was a very tight space in front of the fireplace because of how the chair and ottoman where right in front. Now it is so much more spacious. 


after


after

I love all the pillows Liz picked out and how great they look with the rug and wall color. That pop of the orange is so great with the silvery blue and grays. 


Here are the touches I love- how great is this dog! And the mercury glass she found to go with her mercury glass lamp is perfect.


This is the piece that was her grandmother's - it's so pretty. The lamp on it still needs to be replaced and possibly the glass vessel below may be turned into a lamp to take it's place. Again the orange color is so great.


I love the fun whimsical details she brought in


 Liz found this old bench. We talked about how fun it would be to paint this a shade of orange.


I really like the subtlety of the fabric on the panels. They are just enough to balance out the room with out being overwhelming. Below you see how much the rug really was such a great influence for all the color in the room.

rug from west elm

It was such a fun project and Liz was so nice to work with. It's great to hear that the family really enjoys the room and likes spending more time in there. I'm so glad that we did the project and it was great to see the room from start to finish. And again it was inspiring to see how they took the space and really made it their own. Thanks Liz! 


personalized chocolates

You know the saying, "you are what you eat", well I have now officially eaten too much chocolate! Who knew you could be on an M and M, designer chocolates!
I may be a little late on sharing this, but I just had to stray away from my typical posts and share these great personalized M and M's. My husband ordered these for Valentines Day, not your normal $3 bag by the way, they are a little pricey but so thoughtful and fun. As you see there on the one, it is actually a picture of my husband and myself. We were at a fundraiser the other week and had our picture taken in a photo booth, Mardi Gras hats and all. He had one of the pictures put on the M and M, {yes as I said, I have eaten too much chocolate}. He also had an "I Love You" one made for each of us, I thought this was such a great and surprising way to say I love you.


My latest project

I've been a little preoccupied these days.  Between planning how we are going to start a pretty big project at home, turning our attic into a master bedroom and bathroom,{exciting!}, adding a laundry room area in our powder room,  and everyday life of a busy family. I have been working with a new client now for a couple months on a great project. 


Did I mention big project? Yes this is my client's kitchen, well it will be. I have been helping from the kitchen design, fixtures, hardware, tile, vanities, lighting, etc. etc. It has been so great to see the progress of this house being built. Every time I go over there is something new to look at. This week I will be going to the house, I haven't been in a couple weeks so I can't wait to see how much it has changed, the builders move so fast. The house is planned to be finished in June, until then there is a lot more to be done. I will post pictures of the house as it is being transformed from the picture above to all of the beautiful things that have been carefully picked out. 

sun porch

sun room and living room
Check back over the weekend for updated pictures!

Monday

Bathroom update

I am so excited to be starting a new project that will have a huge pay off, bye bye old tub!
This weekend our old original 1920's cast iron tub will be taken out of our powder room. In it's place will be our washer and dryer, which is currently in the basement, no more going down there to do laundry. But until then a bit has to be done, floor repair for one, we will have to see how bad it is and where the holes are for the plumbing. I would love to put a slate floor down. We also have a shower in there that will eventually be transformed into a nice pantry, that is phase 2. Until then I can dream about my new very convenient space. Below are pictures of my powder room with the tub and then without- it really opened up the whole space.


And now for a little inspiration, I love the look of the barn style doors used below. I would love to do these in front of the washer and dryer and pantry and paint the doors a shade similar to the amber color in the curtains, I love the Robert Allen fabric that I found for the windows.

House Beautiful
BHG
Pinterest

I love the slate floor below in this picture, it would be great with radiant floor heat put down first.
Houzz
I can't wait to get started on planning my new space, I will keep you posted with the progress.

Wednesday

Finns room

I wish that I had thought about how many walls were in my sons room before I told him I would paint stripes, not just 4 but 8 walls. I will make sure I think about that before I do it the next time. But Finn had been wanting his room painted for a few months now so I thought I would have him pick out a color (with a little guidance of course) but I should give him a lot of credit, he picked out a great shade of blue that matched perfectly with the colors in his quilt, Whipple Blue from Benjamin Moore. I picked out Hale Navy, also Benjamin Moore, to go with it. 

Thank goodness for my laser level, as if it is not time consuming enough to get your lines straight but with an old house it always creates a bit more of a problem when all your walls are slightly different heights then the other. Overall I don't think anyone but me can tell that one stripe is a 1/2" or so lower on one side then the other.

 I love how it came out, his walls went from a very pale yellow to fun blue stripes. Usually darker colors can tend to make room look smaller but his room almost looks bigger as you follow the stripes going around. I still need to hang a few more things up and ignore the mess with all his stuff in the one cabinet. The wall hanging you see there was something I did for him a couple of years ago, it is an old kitchen cabinet door that I turned into a place for him to hang things. I got three ball finials from the hardware store and painted them like a traffic light. We also have a stop sign that we found in our garage a few years back, that will go over his bed. In the dormer area I am going to use the one side of the wall and paint a chalk board square for him. One of these days I'd like to paint his bed and chop down the posters and put some ball finials on, but that might not happen for quite awhile.
 He loves his new walls, it really changed the whole room and is a perfect transformation for a boys room. 


Website

I finally got my website up and running, really don't know why it took me so long! You can check it out here  Thanks for checking ...